If noise from upstairs is stealing peace in your finished basement, a focused plan for a soundproof basement ceiling will help. This guide walks Edmonton homeowners through realistic options: what works for airborne and impact noise, which materials to use, how local building rules affect a project, and when a pro should take over. I’ll include local references, plain-language steps, and examples so you can decide whether to DIY or call a trusted contractor like Steadfast Constructions Ltd.
Why a soundproof basement ceiling matters (and what kind of noise you’re fighting)
Before you pick materials, know what you’re trying to stop. Noise falls into two main categories:
- Airborne noise: voices, music, TV. This travels through the air and through openings in construction.
- Structure-borne (impact) noise: footfalls, dropping objects, or rhythmical thumps that travel through the floor structure.
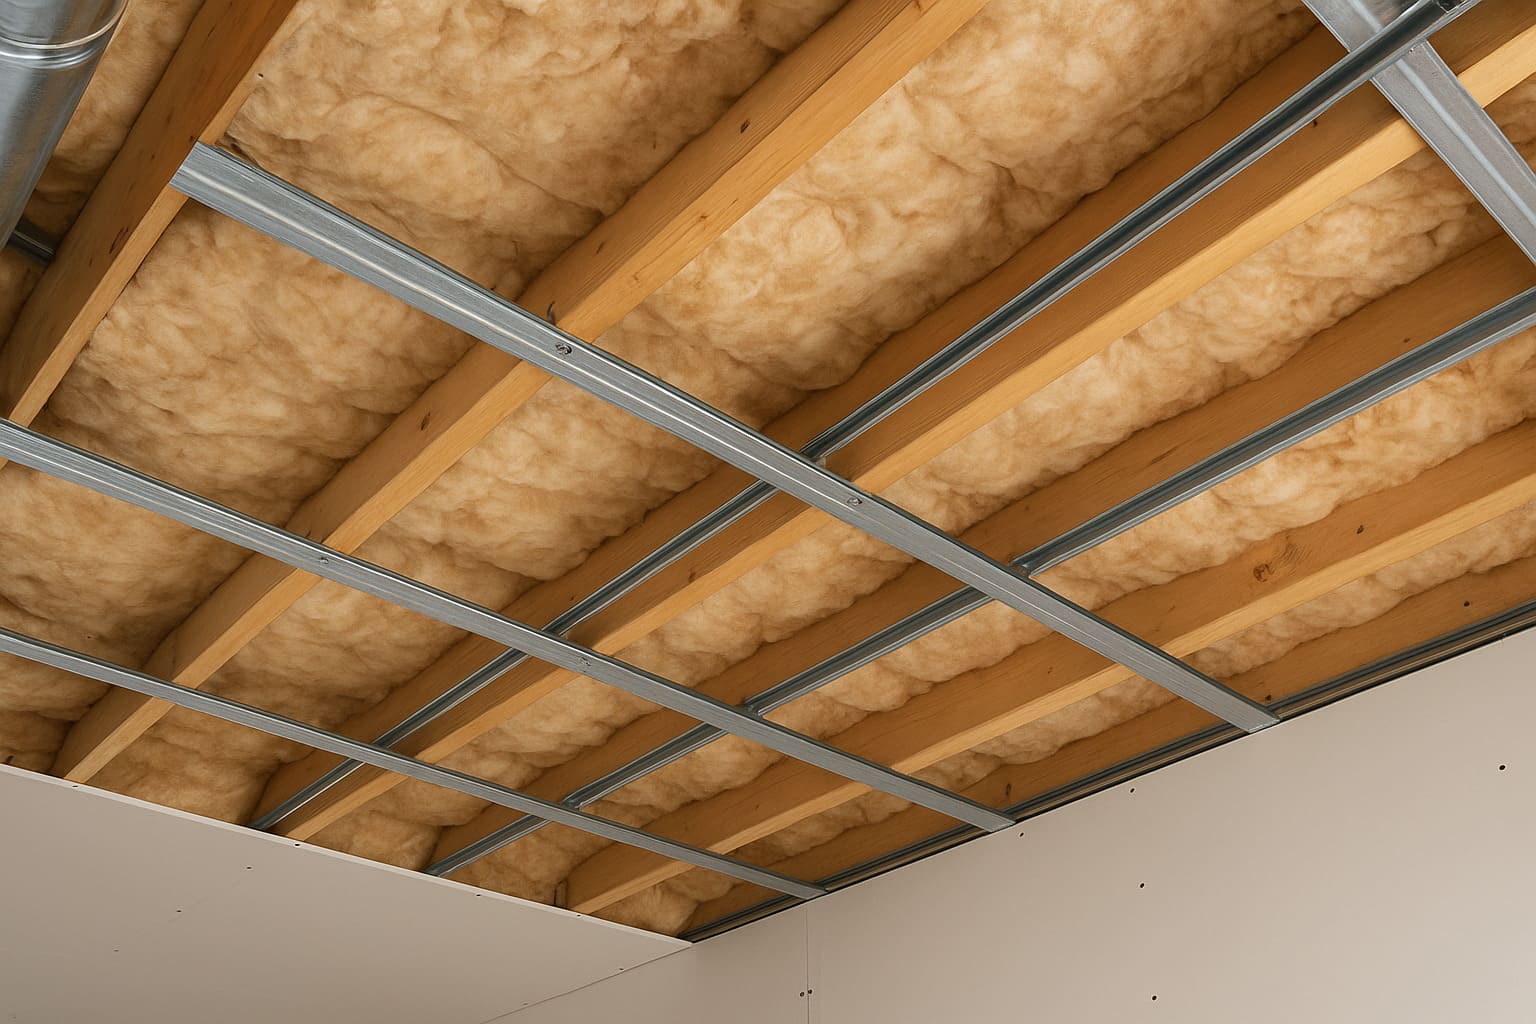
A well-designed soundproof basement ceiling handles both by combining mass, damping, decoupling, and absorption. Mass blocks sound, damping converts vibration to heat, decoupling prevents structure-borne vibration from passing directly through, and absorption reduces reverberation inside the basement. The National Research Council of Canada (NRC) explains the science behind airborne transmission and tools for predicting performance. nrc-publications.canada.ca
How to soundproof a basement ceiling
There’s no single “best” approach for every basement. The good news: common elements combine to give predictable results.
Increase mass and add layers
Adding mass makes it harder for sound waves to pass. Practical ways to add mass to a ceiling:
- Add an extra layer of drywall. Use acoustic joint compound between layers to reduce resonance.
- Consider acoustic drywall (denser panels) for better performance per layer. Rockwool and other acoustics manufacturers describe how additional drywall raises the ceiling’s resistance to airborne sound. rockwool.com
Decouple with resilient channels or clips
Decoupling separates the new ceiling surface from joists so vibrations don’t transfer directly:
- Install resilient channels or resilient sound clips with hat channels. These create an elastic connection that isolates the new drywall from the joists.
- Use a system rated for ceilings rather than walls — ceilings bear weight differently and need specific clips/channels. Manufacturer guidance and trade references show resilient channels are a go-to for retrofit soundproofing. MMT Acoustix
Apply damping materials
Damping products turn vibrational energy into heat:
- Use a damping compound like Green Glue between two sheets of drywall to dramatically reduce mid-range noise and resonance.
- Mass Loaded Vinyl (MLV) is another option: a dense, flexible sheet installed between layers that adds mass and damping without greatly increasing thickness. Family Handyman and other trade sources explain MLV and damping compounds as high-impact additions. familyhandyman.com
Absorb sound in the cavity.
Fill joist cavities with absorptive insulation:
- Mineral wool (rock wool) or fiberglass insulation reduces sound transmission by absorbing energy inside the cavity. Use materials sized to fit snugly without compressing them.
- Ensure you use products rated for acoustic performance; mineral wool is especially effective at mid and high frequencies. rockwool.com
Address flanking and penetrations.
Even excellent panels fail if sound flanks around them:
- Seal gaps around ducts, pipes, and the perimeter of the ceiling with acoustical sealant.
- Insulate and wrap HVAC ducts where they pass between floors — metal ducts are effective sound paths.
- Replace hollow-core doors or add sweep seals to doors leading to loud areas. NRC guidance highlights the importance of controlling flanking paths for effective overall performance.
Best materials to create a soundproof basement ceiling
Short list of practical materials that professionals use:
- Resilient channels / sound isolation clips: to decouple drywall from joists.
- Double or acoustic drywall: heavier panels reduce airborne noise.
- Damping compound (e.g., Green Glue): between drywall layers to dissipate vibration.
- Mass Loaded Vinyl (MLV): flexible mass layer for retrofit situations.
- Mineral wool insulation: cavity absorption and thermal benefits.
- Acoustic caulk: for airtight sealing around penetrations.
Combine two or more of these elements for the best outcome. A single change (one layer of drywall) helps, but combined strategies give the meaningful reduction most homeowners want. Sources from trade guides and acoustic manufacturers back this layered approach. familyhandyman.com
Can you soundproof a basement: DIY vs professional installation
Yes, you can soundproof a basement, but the approach changes with skill level.
DIY-friendly work
If you’re handy, you can handle these tasks:
- Installing insulation in joist cavities.
- Adding an extra drywall layer if you don’t need decoupling.
- Sealing gaps and applying acoustic caulk.
These are cost-effective improvements that reduce airborne noise and improve room acoustics.
Tasks to leave to pros
Bring in a pro when the job includes:
- Installing resilient channels or sound clips across large spans (alignment and load are important).
- Removing and reinstalling ducting or reclaiming refrigerants if HVAC is involved.
- Complex assemblies that need guaranteed performance (for example, a ceiling assembly to meet a specified STC or IIC rating).
Steadfast Constructions Ltd. can design and install a ceiling system matched to your noise profile and local code needs; they also coordinate any required trades, inspections, and follow-up. That’s useful when you want a certifiable, long-term result rather than a “good enough” retrofit.
Building rules, permits, and finishing requirements in Edmonton
Before you start, consider permits. Finishing or changing ceiling assemblies in a basement can trigger building or trade permits, especially when you alter insulation, electrical fixtures, or HVAC components. Edmonton’s renovation guidance makes it clear: do not start structural or trade work until permits are confirmed. When projects require electrical or mechanical changes, separate trade permits and inspections are often required. Check with the City of Edmonton to confirm requirements for your scope. edmonton.ca
Practical tip: If soundproofing involves lowering the ceiling height significantly, confirm egress and mechanical clearance requirements. Steadfast Constructions Ltd. can handle permit coordination and ensure your finished ceiling meets both acoustic goals and local code expectations.
A step-by-step plan to soundproof a basement ceiling
This is a practical sequence a homeowner or contractor can follow.
- Diagnose the noise: Is it airborne (voices, music) or impact (footsteps)? Record times and sources.
- Inspect the ceiling cavity: Check joist depth, HVAC penetrations, and lighting locations.
- Address source control where possible: ask occupants above to use rugs, pads under feet, or soft-soled shoes. Small fixes can make major differences.
- Install insulation: mineral wool in joist bays for absorption.
- Decouple: install resilient channels or sound clips across joists, following manufacturer spacing.
- Add mass: hang one layer of drywall, apply damping compound, then add a second layer of drywall. Or use acoustic drywall for the top layer.
- Seal: Apply acoustic caulk to the perimeter and around penetrations to stop leaks.
- Finish: paint and reinstall fixtures, ensuring that any recessed lighting is rated for the assembly to prevent thermal issues.
If you want guaranteed results or have complicated mechanicals, step 5 is best done by an experienced contractor. NRC tools and acoustic references help predict expected performance if you need an STC/IIC target. nrc-publications.canada.ca
Real-world Edmonton example
A family in the neighbourhood of Riverdale wanted a quieter basement home office. They tried rugs and furniture on the upstairs floor with minimal success. A home assessment revealed large gaps around HVAC runs and an old open joist cavity. The chosen solution combined mineral wool, resilient sound clips, two layers of drywall with damping compound between them, and sealing of flanking paths. After installation, the family reported noticeably quieter calls and reduced bass bleed from the living room above. They worked with a local builder to coordinate permits and electrical adjustments for new lighting. This mixed approach of source control, absorption, decoupling, and mass is what acoustic guides and the NRC recommend for reliable improvements. nrc-publications.canada.ca
Costs, timeframes, and what to expect (planning, not pricing)
While I won’t list prices here, a realistic plan includes time for diagnosis, permit checks if needed, materials lead time, and the actual installation window. A contractor-managed project usually coordinates multiple trades and inspections, which reduces homeowner overhead. If your schedule is tight or you want a guaranteed performance target, hiring a professional like Steadfast Constructions Ltd. reduces the risk of surprise delays and rework.
What to ask when hiring for a soundproof basement ceiling
If you hire a pro, ask these questions:
- Do you provide an acoustic performance estimate or target (STC/IIC) for the assembly?
- Which materials and brands do you recommend and why?
- How will you control flanking paths (ducts, pipes, perimeter gaps)?
- Will you manage the required permits and inspections?
- Can you show recent local projects or references?
Good contractors will explain trade-offs (thickness vs. performance vs. headroom) and provide photos of past installations. Steadfast Constructions Ltd. offers site assessments and will outline options that match Edmonton codes and practical constraints.
Final checklist before you start soundproofing
- Identify the dominant noise type (airborne vs impact).
- Check the City of Edmonton permit requirements for ceiling alterations.
- Plan for addressing flanking paths and mechanical penetrations.
- Choose a layered strategy: absorption + decoupling + mass + damping.
- Decide whether to DIY or hire a contractor; hire pros for resilient-channel installs, refrigerant work, or when a performance target is required.
Conclusion
A soundproof basement ceiling is a practical, often transformative upgrade for Edmonton homes. The best outcomes come from a layered strategy: tackle the noise source where possible, add cavity absorption, decouple the ceiling, add mass and damping, and seal all flanking paths. For straightforward insulation and sealing, a confident DIYer can make real improvements. For resilient channels, HVAC penetrations, and guaranteed acoustic performance, a professional installation saves time and reduces risk.
Steadfast Constructions Ltd. offers acoustic assessments, permit coordination, and full installation services for homeowners who want a reliable, code-compliant result. If noise is affecting your family’s comfort or you want a contractor who understands Edmonton rules and practical acoustics, contact Steadfast for a no-pressure site assessment and clear next steps.
Ready to quiet the basement? Book a soundproofing assessment with Steadfast Constructions Ltd. and get a practical plan for a quieter home.
Frequently Asked Questions (FAQ)
Q1: What is the easiest way to soundproof a basement ceiling?
A1: The most straightforward improvement is adding cavity insulation (mineral wool), sealing gaps around ducts and pipes with acoustical caulk, and installing an extra layer of drywall. For stronger results, combine those with damping compound or resilient channels.
Q2: Can I soundproof a basement ceiling myself?
A2: Yes, tasks like adding insulation and sealing gaps are DIY-friendly. Installing resilient channels or handling HVAC/refrigerant work is best left to trained professionals to ensure safety and performance.
Q3: Will adding another layer of drywall stop footstep noise from above?
A3: Additional drywall increases mass and helps with airborne noise. Impact noise like footsteps is best addressed with decoupling (resilient channels/clips) and by treating the floor above (rugs, underlayment) because mass alone is less effective for low-frequency impact sounds.
Q4: Do I need a permit to soundproof my basement ceiling in Edmonton?
A4: If the work only involves insulation and non-structural drywall without electrical or mechanical changes, permits may not be required. However, many basement ceiling alterations do involve electrical, HVAC, or structural work that triggers permits; check with the City of Edmonton before starting.
Q5: How do I stop sound from flanking around the ceiling?
A5: Seal perimeter gaps with acoustic caulk, insulate and wrap HVAC ducts, use acoustic gaskets around light fixtures, and ensure any shared walls or stairs are sealed. Controlling these flanking paths is essential to making the ceiling assembly perform as intended.


